Hi-van is supported by its audience. When you purchase using our links, we may earn an affiliate commission (no added cost to you). Learn more
Van roofs are known for accumulating rust over time. Unfortunately, this makes them more likely to develop leaks in their metal structure. As a result, most van owners will experience problems with leaking roofs at some point during the life of their vehicle.
Here’s an easy DIY guide on how to fix a leaking van roof:
- Find the leak.
- Apply sealant.
- Test the leak.
- For leaks around a fan, remove and reseal the fan.
Finding your leak can sometimes be problematic, but once you’ve done that, the rest is pretty simple. This guide is designed to help you fix your roof leak quickly and easily, so keep reading to find out how.
1. Find the Leak
The first step to fixing a leak in the roof of your van is to find it! You can do this by using a hose or spray bottle to test the area of your roof where you suspect there’s an issue. There are a couple of common areas that the leak in your van roof can be coming from, including:
- The fan on your van’s roof
- A hole or tear in a rubber seal near an entry door on one of your sliding doors
Once you have found the area where water is coming from inside your van, it’ll be much easier to find out how to fix that leak!
If there are no visible signs of leakage, then spraying some soapy water onto the suspected area would help. Bubbles will appear wherever there’s a problem with a rubber seal. It may also help to scrub the area with a brush or use a hose to spray water onto that part of your roof.
If there’s no visible leakage, then you may need to remove some components from around the suspected area to find out where exactly it’s coming from; this process will depend on what type of vehicle you have and whether it’s possible for you to reach the place which needs fixing.
2. Apply Sealant
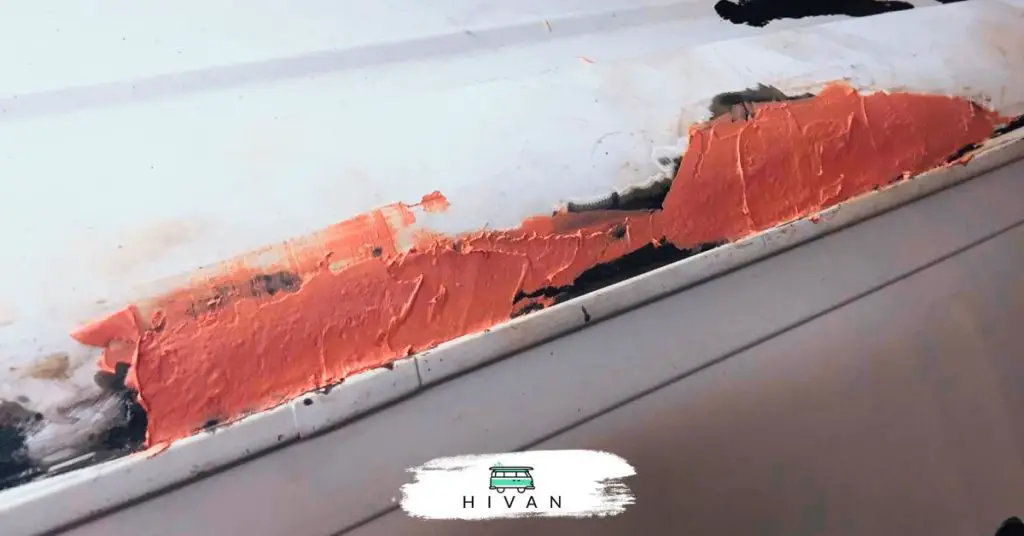
After finding and testing for leaks, it’s time to apply sealer! A good quality rubberized seam sealer should work best. Be careful, though. Rubber-based products melt in hot weather, so check the temperature before applying any product around seams.
Seal all exterior seams with sealer. When done properly, this process will stop water from getting into your vehicle from outside and ruining carpets/upholstery. It’ll also prevent rusting from within.
Self-Leveling Sealant: Creates a strong seal along your RV's roof edges, vent pipes, and air vents.
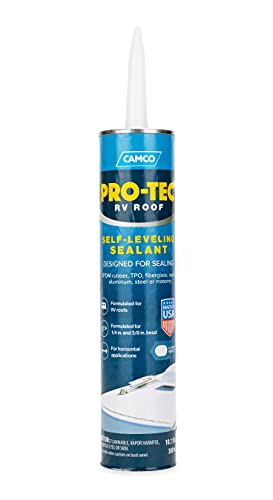
Choose a sealant designed for external use such as the Camco Self-Leveling Sealant (available on Amazon.com). These sealants are weather-resistant and heavy-duty, making them perfect for van roofs. Apply the sealant using a brush to ensure you get complete coverage. It’s best to put the sealer on both sides of the seams before allowing it enough time to dry completely (usually around twenty minutes).
Don’t over-apply; be sparing with your application as too much will just run off, causing a mess. If you’re still unsure about the quantity required, purchase a small can first and do some tests in an inconspicuous area, such as under the wheel arch or behind headlights.
3. Test the Leak
The last step is simple: Test! After applying a new coating, be sure to use a clean cloth or sponge with warm water when cleaning over the areas well again, then wait 24 hours before driving your van. If no spots remain, you’ve successfully fixed your leaking roof!
To test for additional leaks, lay a large sheet of white paper or cardboard out on the ground and place your van roof over it. If there are more leaks, you’ll see water spots from above! Test the sealed area several times before reassembling any components that have been taken apart.
If you’ve been struggling with an old vehicle that has been leaking for years, applying some Tectyl to your underside may be enough to stop any further issues. However, if this isn’t enough, it can lead to replacing the bodywork entirely and other components such as wheel arches or footwells, etc.
This option could become very costly so weigh all the pros and cons before deciding anything final.
4. For Leaks Around a Fan, Remove and Reseal the Fan
For leaks around the fan on the roof of your van, you’ll need to remove the screws on the front of your van to get at it. There are usually around three, so take them out carefully with a screwdriver, but don’t lose them!
To remove the fan, undo the clips that hold it in place – you may need to refer back to your service manual for this. You’ll need to unscrew the bolts inside to take them out.
Once you have the fan in your hand, make sure you clean all of the dirt off around where the screws are – this will help them seal up properly when put back together again.
Once removed, clean around where the old sealant was. Paint the casing around the fan hole in several thin layers, allowing each layer to dry between them. Make certain that any visible metal is painted and that you cover the entire region where old silicone was removed. Allow for overnight drying of the paint.
✔ WATERTIGHT BUTYL TAPE SIZE & MATERIAL: Length:5m (16.4 feet) x Width:5cm (2 inch). Aluminum foil backing, butyl rubber. With a waterproof feature, our watertight tape can stop the leak effectively.
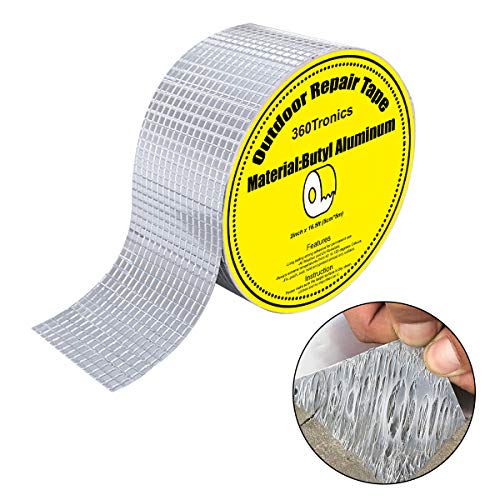
Once the paint has dried, apply an appropriate waterproof sealant such as the 360Tronics Butyl Rubber Tape (available on Amazon.com). Butyl tape like this is waterproof and meant for fixing outdoor leaks. Turn the fan upside down and apply butyl tape to the underside of the fan flange, applying it to one of the four sides at a time. Make sure the butyl tape covers all screw holes and that corners overlap sufficiently to avoid any gaps.
The fan should now be resealed into its original position; ensure everything is secure before reassembling your van again! If you decide not to go ahead with removing the fan completely (which can take up quite some time), then try applying more rubber solution.
Conclusion
Leaking roofs are a common problem in vans, but they’re not impossible to fix. Most of the time, leaks usually happen around seals or vents that can be removed and resealed if necessary, and it’s a lot easier to fix than you might think!
Whether the problem is due to age or rust accumulation, there are steps that can be taken to fix it and prevent future leaks from developing in the metal structure of your vehicle.
Find this content useful 🙂 ?
Subscribe to our Newsletter and get a free Solar Electric Diagram + shopping list.