Hi-van is supported by its audience. When you purchase using our links, we may earn an affiliate commission (no added cost to you). Learn more
Whether you’re replacing old shocks or adding a brand-new set to an old trailer, shock absorption is always welcome. Your travel trailer won’t bounce all over the place, nor will the wheels take too much pressure on bumpy roads; But you might be curious how you can add to your trailer or if it’s even possible.
To add shocks to a travel trailer, follow these steps:
- Choose the shocks for your travel trailer
- Add shock mounts if necessary
- Jack the trailer up
- Remove each wheel to reveal the shocks
- Add the new shocks to the trailer
- Replace all four wheels
- Test your shocks
Throughout this article, we’ll show you the details about each step of adding shocks to a travel trailer. We’ll also break down the most common shocks for trailers, where you can get them, and more.
Choose Which Type of Shocks You Want
Choosing the right shocks includes the brand, size, and style. Let’s examine the four main styles of shocks you can install on your travel trailer below.
- Coil-based shock absorbers. These shocks work with springs that coil around the shock, letting the vehicle bounce without damaging the wheelbase. Many coil-based shocks can be adjusted in small increments to fit your travel trailer.
- Monotube shock absorbers. One tube sits in the middle of two pistons that keep nitrogen and air separated. The natural pressure created by the gasses provides a cushion when going over bumpy roads.
- Twin-tube shock absorbers. A twin-tube shock is the opposite of its predecessor. It uses two tubs and one piston that separate air from shock fluid to pad the wheels and suspension system.
- Reservoir shock absorbers. These shocks are made with a tube that’s filled with nitrogen and air. As the travel trailer bounces and moves, the substances resist one another to soften the blow.
- Heavy-duty shock mount kit
- Available sizes: 2.375" or 3"
- Bolt-on shock kit absorbs road shock to provide a more comfortable towing experience
- Kit comes with everything needed to attach gas shocks to existing RV or trailer suspension utilizing a 3" or 2-3/8" axle tube

The Lippert Bolt-On Shock Mount Kit comes with everything you need to install shock mounts and add shocks to all four wheels on your travel trailer. Make sure the gap is wide enough between the shock mounts and the wheels (3.5 inches for this set) to fit your travel trailer.
Get Shock Mounts if Your Trailer Needs Them
If you don’t already have shock mounts, you’ll need to add them to the trailer. Most people prefer hiring a professional since the mounts are debatably the most important part of the process. If the mounts are wobbly, the shocks won’t work.
According to the Savvy Campers, many travel trailers come with pre-installed shock mounts, even if they don’t have shocks.
If you need to add shock mounts, you’ll have to hook the U-bolt around the axle, bolt them on the outside to secure them, and mount the other bracket to the travel trailer. It’s quite a complicated process, so most sources suggest hiring a pro.
Jack the Trailer to Access the Shock Absorbers
To work on the shocks, you’ll have to elevate the travel trailer with a jack. Place jacks on all four sides. You can also choose to elevate the front or back of the trailer, but make sure both sides are raised before working on the shocks.
If you elevate one side and not the other, the shocks will be uneven. Raise the trailer with jacks until the tires are about six to twelve inches off the ground, then lock them, so they don’t shift.
Remove All of the Travel Trailer’s Wheels
Use a lug wrench for the following process:
- Find the correct size wrench you need to remove the lug nuts. The Cartman Universal Lug Wrench has all four sizes you’d need to remove the bolts on your travel trailer’s wheels. It’s cross-shaped to provide leverage and help you remove the lug nuts with ease.
- Grab the edges of the tire and slowly wiggle it back and forth while pulling it toward yourself. You can also grip the inside of the rim if there’s enough space. Do this until you remove the wheel, then set it aside.
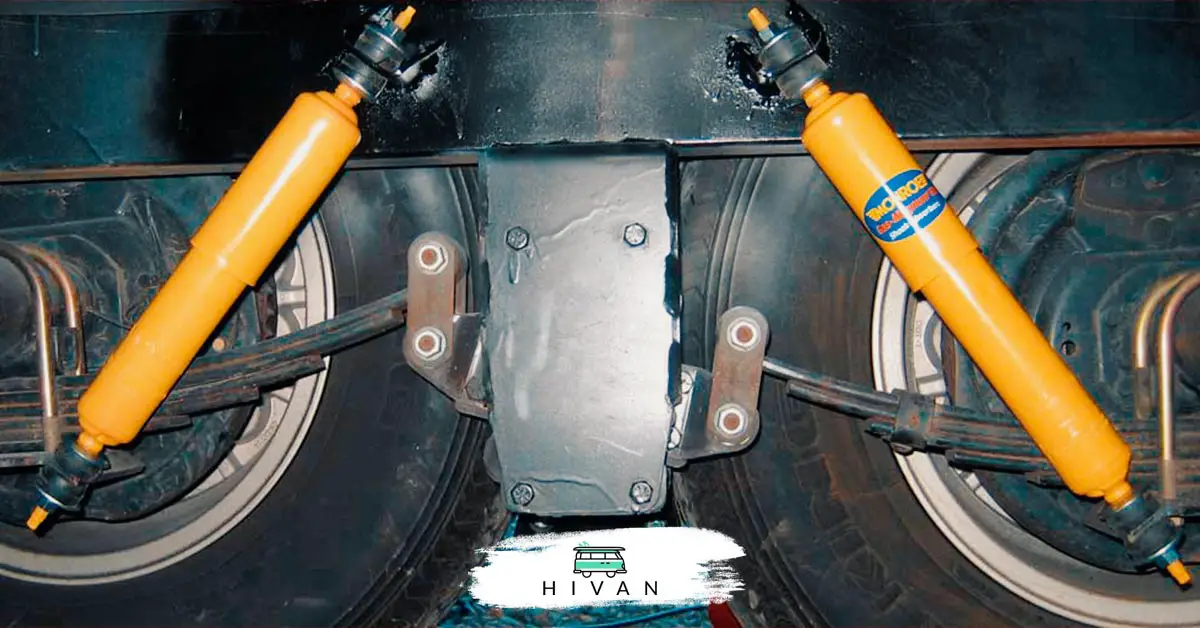
- Perform the aforementioned two steps on all four tires (or however many are jacked). You should be able to see the shocks mounts and shock absorbers once you remove the wheel. They’ll be right in front of the axle. The shocks look like a long piston that’s typically placed at a 20-degree to 45-degree angle.
Install the Shocks on All Four Wheels
E-Trailer shows you need to have enough space between the tire and the frame to use the shocks. Make sure you have the labeled measurements from the shocks you’re installing before following any of these steps. When you’re ready, perform the method below.
- Use a socket wrench to remove the bolts on the old shocks (if you had them). If not, head to the second step.
- Line the new shock absorbers with the shock mounts. There should be a hole on both bases, letting you slide the bolt through the shocks and their mounts. Make sure the shocks are facing upright.
- Tighten the bolts on the shock mounts on both sides of the axle. You can add screw glue to prevent them from loosening.
Review this video guide for a helpful tutorial:
Put the Wheels Back on the Trailer and Lower It
Follow the aforementioned wheel removing instructions in reverse. Tighten the lug nuts with the same universal lug wrench, ensuring none of the tires wobble or move. You can also take this time to fill the tires with air to the labeled PSI.
Test Your Shock Absorber Installation
Now is the time to drive around the block and go over a few speed bumps. You shouldn’t feel the trailer bounce around too much. Keep in mind that shock absorbers relocate the pressure, but they don’t prevent the trailer from moving up and down a little bit.
It’s best to perform a test on a bumpy road or bring it to a local campground. The goal is to see how it feels when you’re camping, but you don’t want to go too far in case something goes wrong with the installation.
The most common issues include failure to tighten the bolts enough, not using screw glue, adding the wrong shock absorber size, or attempting a DIY shock mount installation.
Find this content useful 🙂 ?
Subscribe to our Newsletter and get a free Solar Electric Diagram + shopping list.