Hi-van is supported by its audience. When you purchase using our links, we may earn an affiliate commission (no added cost to you). Learn more
If you’ve been living in your van for some time, you should know by now how crucial water is. If you don’t have water or your water system is broken, you can’t stay in your van.
I’ve been using an electric water pump until it broke down in the middle of nowhere.
I had to drive back to the closest city to get it fixed. This is when I decided to install a manual foot pump. It’s easy to use, you don’t need any electricity to run it, it’s almost indestructible and you can save a lot of water thanks to it.
In this article, I’ll explain how you can install a van foot pump in your camper.
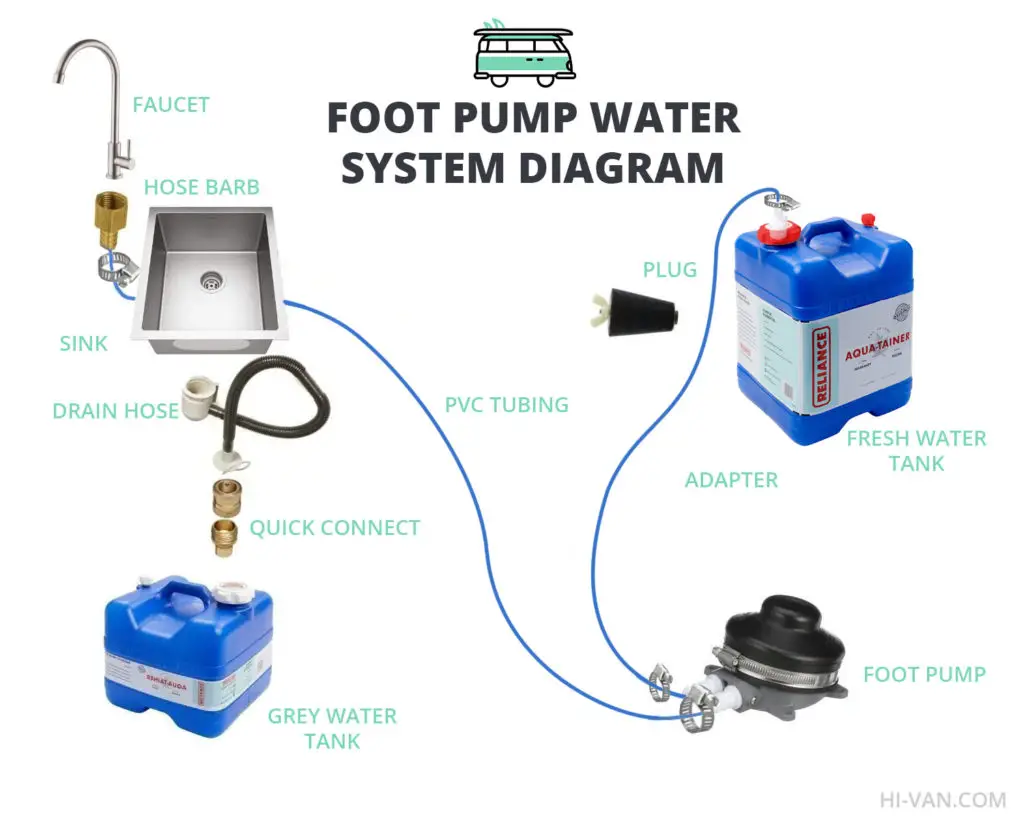
Here’s what you need:
- Faucet
- Hose barb
- Sink (click here to check 16 of the Best Van Life Kitchen Sink Setups)
- Drain hose
- PVC tubing
- Hose Quick Connectors
- Water tank x2
- Stainless steel hose clamp
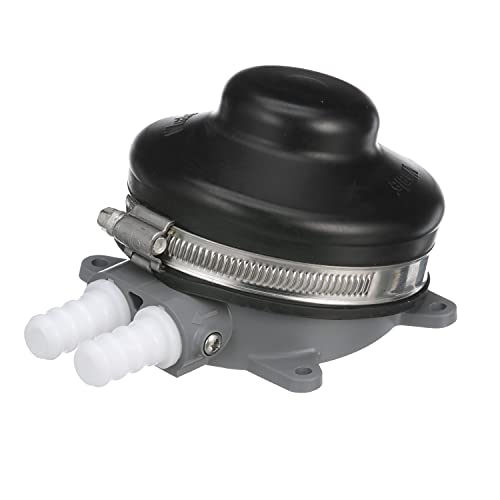
- Foot pump
How to Install a Water Foot Pump in your Camper
- Foot-operated galley water pump makes it easy to draw water in a galley for a wide variety of applications.
- Simply pump on this unit with the bottom of your foot to draw water
- Conveniently angled top design for easy operation
- Connects to ½-inch flexible hose
– Prepare the water tank you will use for your fresh water.
You need to connect it to your water pump with PVC tubing. Ideally, connect your tubing to the tank lead and don’t drill any holes in your tank. Therefore, you’ll be able to easily take out your fresh water tank whenever you need to refill it and you won’t risk any leak.
As a manual foot water pump isn’t as powerful as an electric pump, you should put your fresh water tank as close to your faucet as possible. You also want to keep easy access to it for refills.
– Place your foot water pump on the floor
Place it somewhere easy to access with your foot while avoiding it blocking all your floor space.
– Connect your foot pump to your faucet.
– Ensure that you tighten each connection with hose clamps.
– Connect your drain hose from your sink to your grey water tank using a quick-connect fitting.
You can use a quick-connect fitting to easily dump your grey water when full. Remember to always dump your grey waters in appropriate locations.
– Test your water system and double-check for leaks.
– Fit your water tanks to avoid any movements while driving.
You’re set to go. Enjoy a reliable water system that will save you a ton of water at the same time.
It shouldn’t take you long to notice a big decrease in your water consumption. Furthermore, while saving water thanks to your camper foot water pump, you also exercise while using it.
Here’s a quick video to show you how Gene & Shay (@geneandshay) did their water pump installation.
If You Don’t Want to Use a Foot Water Pump:
You can simply purchase a small spray bottle that you refill and use to do your dishes and other tasks that require water. Before purchasing my Foot Water Pump, I used this simple Water Spray for 1 years. I could spend on average 1-2 days extra before refilling my fresh water tank, that’s huge!
- 2 LARGE 16 OUNCE BOTTLES with easy-to-pull, durable nozzle. Two spray settings: fine mist or a strong stream.
- SILICONE SLEEVE prevents the glass from breaking on tile and countertops. 2 colors to identify your cleaning solutions.
