Hi-van is supported by its audience. When you purchase using our links, we may earn an affiliate commission (no added cost to you). Learn more
After a long day of camping, you’re finally back in your RV and can’t wait to hop into the shower. You light the pilot to fire up your water heater, but it won’t stay on no matter how many frustrating times you try. Most likely, the problem is your thermocouple, but you can’t be sure until you test it.
If you encounter other issues during your travel, check my resources page about van life here.
Here’s how to test your RV thermocouple in 4 steps:
- Turn off your propane gas valves and locate the thermocouple.
- Remove the thermocouple.
- Choose a thermocouple testing method.
- Test the thermocouple using your preferred testing method.
Read on to learn how to recognize thermocouple problems and the various ways you can test your unit to confirm or disprove your doubts.
Identifying Thermocouple Problems
Before we get to the process of testing, let’s review the signs of a faulty thermocouple. This will minimize your chances of going through the whole testing process only to find out that the thermocouple is fine and the problem isn’t even related to this part of your RV’s water heater.
A thermocouple is a safety feature in many older RV gas water heaters. It uses the heat generated by the pilot light’s flame to generate a small electric current that keeps the gas valve open. If the pilot light doesn’t stay on, the thermocouple cools down and stops generating this current, causing the gas valve to shut off to prevent a gas leak.
Since keeping the pilot light on wastes gas, you most likely keep it off. Using this as a starting point, you can tell whether the problem with your water heater is a thermocouple malfunction by doing the following:
- Switch your burner control valve to “pilot.”
- Locate the pilot light control button, press it, and bring a flame to the pilot light burner.
- Keep the pilot light button pressed down for 30 to 45 seconds as you hold the flame to the burner.
- Release the control button and observe if the pilot light stays on.
If the pilot light doesn’t stay on in step 4 above, the problem with your RV water heater is most likely a faulty thermocouple.
To be sure, you’ll need to test it, which brings us to the next part.
1. Turn Off Your Propane Gas Valves and Locate the Thermocouple
First off, turn off your propane gas valves to prevent potentially dangerous gas leaks. With your safety ensured, the next step in your preparation should be to identify the thermocouple.
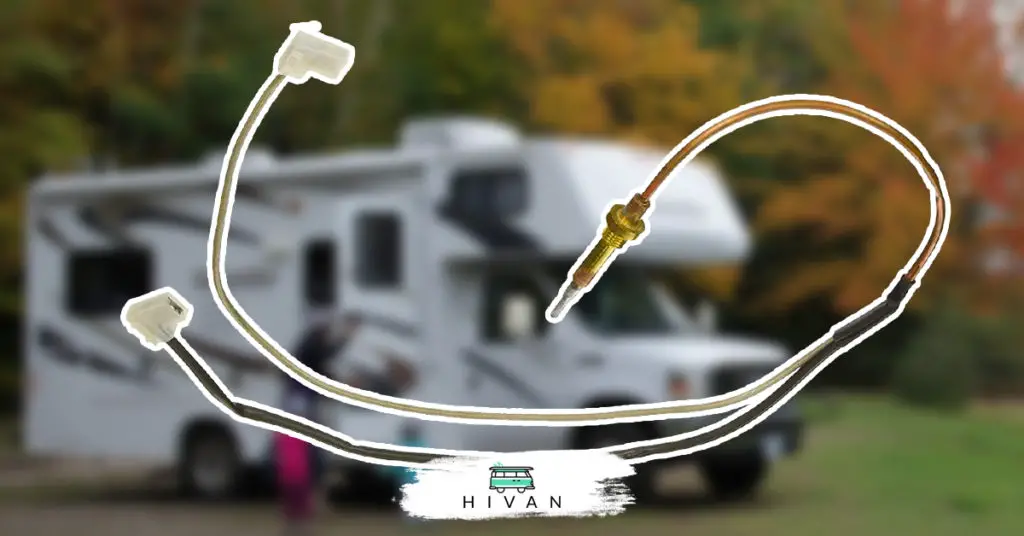
Inside your unit’s main burner, you’ll find an assembly comprising the pilot flame burner and the thermocouple. What you’re looking for is the cylindrical, uppermost part of this assembly.
Quick Tip: If you’re struggling to find the thermocouple even with the above description, search “thermocouple/burner assembly” on Google and check the image results to understand better what it looks like.
With that out of the way, you’re now ready to start testing your thermocouple.
2. Remove the Thermocouple
Before you start testing, though, you have to remove the thermocouple. To do this, open your RV’s back latch. You’ll see a connecting wire that resembles a small tube and runs from the interior components of your RV to the gas valve (AKA, the small metallic box-like component with several control knobs).
Using a 3/8-inch (0.95 cm) open-end wrench, unscrew the threaded end of this wire from the gas valve to free it. Next, detach the sensor bulb from the pilot flame burner assembly. This will be on the other end of the tube-like wire connector.
If you get lost in the components, check out the first two minutes or so of this video:
PS: The video is about replacing a thermocouple. No need to watch the entire thing; just focus on the part about removing the thermocouple (1:00).
3. Choose a Thermocouple Testing Method
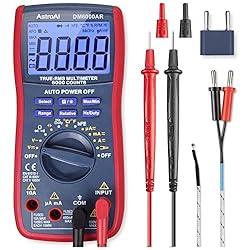
There are three types of tests you can use, and all require a multimeter that can read DC volts. These include:
- An open circuit test: Indicates the number of millivolts a thermocouple can produce when disconnected (in technical terms, without load).
- A closed-circuit test: This test shows the number of millivolts used by the electromagnetic coil.
- A resistance test. A resistance test measures whether the thermocouple has continuity.
Of all the three, I’d recommend a closed circuit test because it indicates whether the thermocouple can perform well under load.
4. Test the Thermocouple Using Your Preferred Testing Method
How you go about this will depend on the type of test you selected in the previous step. And while I did recommend a closed circuit test, I’m going to outline the steps for all three tests in case you want to perform all or either resistance or an open circuit test.
How To Perform a Resistance Test
- Select the resistance or ohms option on the multimeter.
- Place one of the multimeter test leads on the side of your thermocouple.
- Place the other test lead to the end of the thermocouple that connects to the gas valve.
If your thermocouple has continuity, you’ll notice a small resistance reading. Depending on the multimeter you’re using, you may also hear an audio notification when continuity is detected.
On the other hand, if your thermocouple doesn’t have continuity, the multimeter’s reading will be “OL,” indicating that the unit isn’t usable and needs replacement. That’s because when a thermocouple doesn’t have continuity, it indicates that it’s not producing the electric current required to keep the gas valve open.
How To Perform an Open Circuit Test
- Start by switching your multimeter to millivolts.
- Bring one of the test leads to the side of the thermocouple.
- Place the other lead to the end of the thermocouple that connects to the gas valve.
- Bring a flame to the opposite end of the thermocouple.
According to HeatingHelp.com, the ideal reading should be between 17 and 18 millivolts. Any reading outside this range suggests a faulty thermocouple.
How To Perform a Closed Circuit Test
For this test, you’ll need to attach crocodile clips to the test leads. Once you do that:
- Connect the thermocouple adapter to the gas valve.
- Fix the thermocouple into place like you normally would, except screw the end that usually connects to the gas valve to the adapter.
- Turn on the appliance and use a crocodile clip to connect the side of your thermocouple to the multimeter.
- Connect the remaining crocodile clip to the screw that protrudes out of the side of the thermocouple adapter.
According to Hunker, the ideal reading should be 12 to 15 millivolts. Anything lower than 12 millivolts indicates a defective thermocouple.
Related Article:
Guide: How to know if RV water heater is full
Final Thoughts
Hopefully, you’ve understood what a thermocouple does and how to determine whether it’s defective. And while we’ve covered three tests, you don’t necessarily need all of them to determine whether your thermocouple needs replacement.