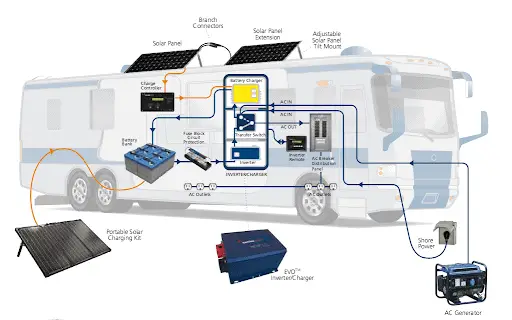
Solar power is a costly investment upfront but can dramatically change the way you live in your van. You won’t need to pay to have electricity anymore, and that can save some nice money.
Do you want to be self-sufficient in terms of clean, free energy while enjoying the best of van life?
Go off the grid and install a solar kit for your van. With the right tools and supplies, you can turn your van into a weekender warrior or boon docker dream`s ride.
When installing a solar system, you can`t connect your solar panels directly to your van batteries. The first reason is that you need a charge controller to regulate the energy coming from your panels. An irregulate current isn’t suitable for your battery. Secondly, you always want to have a dedicated secondary battery for your solar system to avoid any possible issues.
But don’t despair. With the right parts, you can power your campervan with clean solar energy stored in batteries.
There are a lot of questions on how you can implement an RV solar system. How do solar panels work, which type of
The first step toward installing solar power is checking how much energy you’ll need in your motorhome. We created a guide where you’ll find everything you need to know before installing your solar system here.
Connect solar panels to your campervan – The right way!
In this post, we’ll walk you through all the ins and outs of connecting the

Before you climb on top of your van to fix your solar panels, ask yourself a few questions:
- How many devices are to be powered by the solar system?
- What’s the best type of battery I need to use?
- What size my solar panels need to be?
Let’s Size Your System in 3 Easy Steps
Step 1: Audit your average electricity consumption.
First, list out all of the devices and accessories you’re using on a daily basis. Then you want to note how many watts each of them is using. You can usually find this information on the device itself or in its notice manual.
Then, try to estimate how many hours you will be using each device. Multiply that by the hours, and you have your amount of electricity that is defined as Watt-hours!
Watts x Hours = Wh
Step 2: Determine the battery capacity you will need.
We will assume that we need 1200Wh of electricity
Battery capacity is measured in amp-hours (Ah). To convert watt-hours into amp-hour, you simply need to divide your watt-hours by your system voltage (usually 12V).
“Ah” is the measure of battery capacity, and to calculate the size of the battery, we will divide 1200 by the system voltage of the motor-van which is 12V,
1200 Wh / 12V = 100Ah.
Based on this calculation, you would need 100Ah of battery. But this can vary depending on the type of battery you want to use; more about that here.
Most RV batteries shouldn’t be depleted below 50% of their capacity (this goes for regular flooded-lead-acid, AGM, and gel batteries). If these batteries get depleted below the 50% battery capacity mark, there is a risk of shortening its lifespan and/or damaging them. So, in reality, the usable capacity of these types of batteries is about half. In the case of a 100ah battery, 50ah is usable capacity.
Lithium batteries are different. You can use 100% of their capacity. There are way more expensive, but their life span is a lot better, and they are also much lighter than regular solar batteries.
Step 3: Figure out how many solar panels you will need to charge your batteries each day fully.
Solar panels are rated in watts. We’ll again use our assumed 1200 watts of power consumption. To get the number of solar panels needed, we will assume we want to fully change our system in 5 hours of perfect sunshine. Here’s how we calculate it:
1200 Wh / 5 hours = 240 Watts. It means that a 240 watts
You’ll always want to outmatch by a little (about 20%) this number to overcome cloudy days.
What do you need to connect your solar panels to your battery correctly?![]()
Panels: they do come in various types and sizes, and additional ones can be added without a significant whole system remodeling (only if your charge controller can handle it).
Charge controller: This device regulates the flow of electricity from the solar panels to the batteries to prevent overcharging and charge it the best way possible.
Battery monitor: it allows you to know the charge level of your battery. They act in the same way as fuel gauge does to your fuel tank. You can check on how many more amp hours you have left, how much energy you’re currently using, and how much you’re producing. It’s convenient and allows you to understand your consumption better and be more efficient in using your system.
Inverter: this device is used to convert the Direct Current (DC) coming from your battery (usually 12 volts) into Alternating Current (AC), which is needed to run most electric items nowadays.
Wire harness: electrical wires that carry the power charge from the panels to the solar batteries and around the motor-van. It’s crucial to have the correct size of cables corresponding to the amount of current.
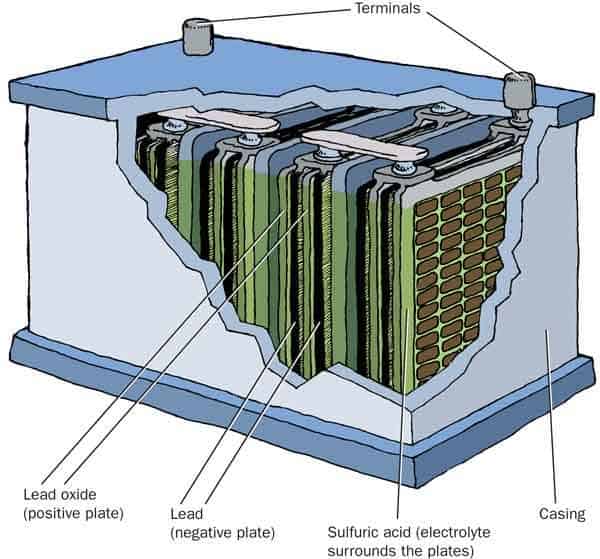
Batteries: These are power storage units at 12-Volt DC (direct current), which can power all connected ancillary devices such as laundry machines, TVs, modems, lights, air-con, etc.

Conclusion
Understanding how a solar system works and its main components will help you choose the best solution for your RV. You don’t want to invest in a solution that won’t fill your needs and role on your nerves.
Before “pulling the switch,” double-check all your connections, especially pricey electrical gizmos, which can be lost all in smoke.
A solar power system powers all your van devices every time the sun comes out – and even on cloudy days. Solar power will keep your van battery fully charged, helping it stay in good condition and extending its lifespan.
